Warning: include(/data/htdocs/hebergementweb/sites/imagemed.univ-rennes1.fr/en/nav.html): failed to open stream: No such file or directory in /data/htdocs/hebergementweb/sites/imagemed.univ-rennes1.fr/template.php on line 144
Warning: include(): Failed opening '/data/htdocs/hebergementweb/sites/imagemed.univ-rennes1.fr/en/nav.html' for inclusion (include_path='.:/usr/share/pear:/data/htdocs/hebergementweb/php-include') in /data/htdocs/hebergementweb/sites/imagemed.univ-rennes1.fr/template.php on line 144
MRQuantif: installation, first start and updating
Main directory
After downloading the zip, extracting its contents creates a MRQuantif directory which is the main directory of the software.
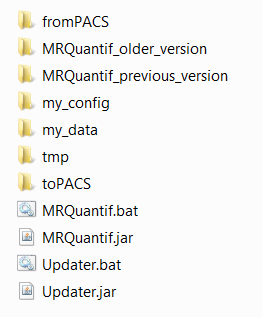 It contains:
- the MRQuantif.jar file hich is the main file of the application java. It launches by double-clicking if you have java 8 installed.
- the MRQuantif.bat ile which is the launch file of the application if the java 8 is in an adjacent jre directory.
- the Updater.jar and Updater.bat files that update the MRQuantif application. You do not need to run them because they are only used by the main application
- the sample directory which contains a restricted example with just a few DICOM images.
Launching
The software starts with a double-click on MRQuantif.jar if you have java 8 installed. Otherwise, and only on PC, by double-clicking MRQuantif.bat. This windows command file will look for if there is a jave 8 in the program directories or use java 8 otherwise in an adjacent directory called i>jre. You can download this directory from the site in the download section or by ou clicking here. This download retrieves a zip file containing the directory i>jre to set up
Internet access
At launch, MRQuantif seeks to connect to the internet. It is advisable to allow it to cross the firewall. If it fails to connect you will have:
 Otherwise the message will be variable depending on the actions selected in the configuration:


Indeed the internet connection is useful so that the software can:
- automatically search for a new version ("update") if you have chosen in the configuration to check the updates (see Configuration). If you block the connection the use of the software will be limited in time to avoid the use of obsolete versions. You will then have the following message:
 If the software could check the version you will get the following message:

- and, if you wish (see configuration), export to your personal cloud space the measured data in a completely anonymous way respecting the international rules and integrating a time lag of the date of the study.
Initialization
At launch, MRQuantif opens a single window that contains three areas:
- fromPacs et toPacs for exchanges with PACS,
- my_data to locally store a folder by study containing the selected images and the data obtained,
- my_config which contains the config.txt configuration file and the license.bin license file.
Use
Au lancement, MRQuantif ouvre une fenêtre unique qui contient trois zones :
- the upper part is constant and gives you information about the current internet connection and the installed version. It also allows you to modify the current user. The list of users and the definition of the default user is done in the "Configuration" section. It can also be found if it has been activated in the configuration a drop-down menu to choose a clinical research protocol. It also contains the tabs that can navigate in the different parts of the software that we will detail.
 The message "Not for clinical routine" reminds you that this software is not marked CE or FDA. This does not mean that it is not reliable and efficient, but simply that it has not been analyzed by a national regulatory authority that verifies compliance with the development and dissemination rules. CE marking is being implemented. If this step is completed, then the Canadian accreditation will be requested. An FDA application is not currently considered for financial reasons.
 - the middle part is variable according to the activated tab. These tabs provide access to the various stages of an analysis and the configuration of the software:
- "DICOM Browser" to browse the disc directories and find selectable DICOM images.
- "Viewer" o display the selected images (one stack per series) and place the circular ROIs.
- "Results" to display numerical results and graphs showing signal decay as a function of echo times.
- "Text" to display a preliminary report that can be copied in whole or in part.
- "Configuration" to choose preferences, set defaults or modify users.
- "About" to inform you about the software.
- the bottom part is constant and contains buttons and help messages that guide you through the different steps.
 The present buttons allow, from left to right:
- to directly access the my_data directory containing the folder of the folders analyzed studies. In each folder is an images directory containing the non-anonymized images used for the measurements but also a data.json file which contains the structured data, also non-anonymized. You can decide to anonymize the whole content of this directory by default in the Configuration section
- to create or recreate a zip file containing the images selected but anonymized. This can be useful for sending an example by e-mail.
- to access the internet folder ("cloud") of the user selected at the top right of the screen, in the upper banner, provided that the email is correctly entered.
- to access the online help.
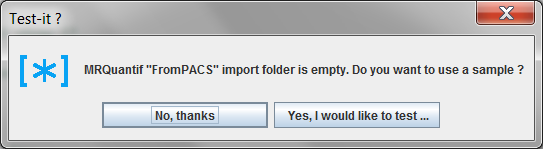
Example provided for testing
If there are no images in the default import directory, the software proposes to use the example provided and present in the sample directory.
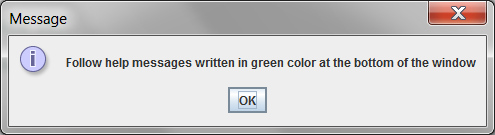
As indicated in the following message, you will be guided by the messages at the bottom of the window.
Update
Connected mode
If there is a new version available, and if you are connected with the update enabled, you will see, a few seconds after the launch, a modal window containing information about the changes made in the new version. Unless there is a major correction needed to continue using the software, you may decide whether to load this new version. The loading time is short and is done in the background without slowing down or disrupting your use. The replacement of the version will be done when closing the software, without lengthening it. The following use will be done with the new version. The replaced version is kept in history in a MRQuantif_previous_version directory. So in case of difficulty you can easily return to the previous version. Possibly there is also the penultimate version in the directory MRQuantif_older_version. Only the last two versions are kept.
How does it work? If you have started downloading an update a MRQuantif_update.zip file is uploaded in the background. It is then immediately decompressed into an Update directory. The MRQuantif_update.zip file is deleted. When you quit MRQuantif it tests the presence of a file MRQuantif_update.zip and then launches the software Updater.jar (possibly via Updater.bat under windows). This installs the update by moving the new files and directories in the directory Update to the main directory while moving the old versions of these files into the directory MRQuantif_previous_version. Of course the old directory MRQuantif_previous_version a previously renamed MRQuantif_older_version. If at the next launch of the software there is still an Update directory the operation resumes ... and if it continues you just delete the directory Update, warn me and do not resume the update until the correction has not been brought. But normally this should never happen...
Non-connected mode
You must then check for yourself the presence of a new version on the website in the Download section. Download the zip, name the MRQuantif_update.zip and put it in the MRQuantif main directory at the same level as MRQuantif.jar. The update will be implemented automatically at the next closing of the software. You can also manually replace the files, but this manual operation does not support the version history.
Do not touch the my_data and my_config directories that contain your data and preferences. The update does not affect this because these directories are created the first time you boot, and they do not exist in the installation or update zips. These two directories are to save by yourself even if you want to secure them. The internet export option is an additional security but is not contractual.